Saturday, 30 July 2011

Host Name Verification


A host name verifier ensures the host name in the URL to which the client connects matches the host name in the digital certificate that the server sends back as part of the SSL connection. A host name verifier is useful when an SSL client (or a WebLogic Server acting as an SSL client) connects to an application server on a remote host. It helps to prevent man-in-the-middle attacks.
By default, WebLogic Server has host name verification enabled. As a function of the SSL handshake, WebLogic Server compares the common name in the SubjectDN in the SSL server’s digital certificate with the host name of the SSL server used to initiate the SSL connection. If these names do not match, the SSL connection is dropped. The SSL client is the actual party that drops the SSL connection if the names do not match.
If anything other than the default behavior is desired, either turn off host name verification or configure a custom host name verifier. Turning off host name verification leaves WebLogic Server vulnerable to man-in-the-middle attacks. Oracle recommends leaving host name verification on in production environments.


Verify host name verification is enabled


To verify that host name verification is enabled:
  1. In the left pane of the Console, expand Environment and select Servers.
  2. Click the name of the server for which you want to configure host name verification.
  3. At the bottom of the page, click Advanced.
  4. Verify that the Hostname Verification field is set to BEA Hostname Verifier.
    If you want anything other than the default behavior, either turn off host name verification or configure a custom host name verifier. Oracle recommends leaving host name verification on in production environments.

Disable host name verification

Turn off host name verification in one of the following ways:
  • On the command line of an SSL client, enter the following argument:
    -Dweblogic.security.SSL.ignoreHostnameVerification=true
    Note: When using stand alone SSL clients, host name verification must be set on the command line or via the API.
  • In the WebLogic Server Administration Console:
  1. If you have not already done so, in the Change Center of the Administration Console, click Lock & Edit
  2. In the left pane of the Console, expand Environment and select Servers.
  3. Click the name of the server for which you want to disable host name verification.
  4. Select Configuration > SSL , and click Advanced at the bottom of the page.
  5. Set the Hostname Verification field to None.
    Oracle recommends leaving host name verification on in production environments.
  6. Click Save.
  7. To activate these changes, in the Change Center of the Administration Console, click Activate Changes.
    Not all changes take effect immediately—some require a restart 

Monday, 18 July 2011

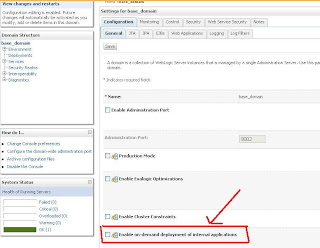
Disable on-demand deployment of WebLogic console application

You often see the below message during access of weblogic console -
-------------------------------------------------------------------------------------------------------------

Deploying application for /console........


This application is deployed on the first access. You can change this application to instead deploy during startup.
Refer to instructions in the On-Demand Deployment documentation.
--------------------------------------------------------------------------------------------------------------


because weblogic deploy /console application at first access and this could slow the access of your admin console first time. disable the below parameter if you want deploy /console app at startup of admin server instead of during first access.


  • Log on to the WebLogic console,
  • Click on your domain, e.g. base_domain,  in the left navigation bar in the WLS console,
  • Open the Configuration tab and then the General sub-tab,
  • Deselect the checkbox labeled Enable on-demand deployment of internal applications, and

  • Click on the Save button.
now restart and access your admin console, you will not see that message again.


Saturday, 16 July 2011

Sun JDK and Jrockit

As we all know, JVM is responsible in converting the java byte code into machine code (which the machine understands)
Sun jdk and Oracle JRockit do the same thing using different mechanism.
**************************
Sun JDK uses interpreter (Interpreter and JIT in previous releases) – In this mechanism, the byte code is read and the translated into machine language, but these results are not saved in the memory. So every time even if the same method is run again and again, the JVM has to translate the code into machine language. This means machine code will not be reusable as it is not saved anywhere in the memory.
Oracle JRockit uses only JIT compiler (Just In Time) – JIT mechanism means, once a method is run, the byte code is translated to machine language and this is saved in the memory. This means if the method is run again, there is no need for translation and the machine code is reused.
Because of the interpreter mechanism used by sun jdk, the start up time for the server is faster because it does not have to save the machine code in memory. Once the translation is done for a method, it moves to the other one. Where as oracle JRockit saves the code, which is why  start up takes longer. For the same reason, oracle JRockit uses more memory than sun jdk.
In the long run, JRockit gives a slightly better performance as compared to sun jdk.
**************************
Oracle JRockit optimizes the code. It identifies the HOT SPOTS which means the methods that are being run more often. These methods are then queued up for optimization. This code is then optimized which improves performance. Many issues are seen becuase of the code optimization mechanism because it is a complex procedure. Optimization can be disabled.
JIT is also used by Sun JDK, but that was in the earlier versions. The Java Hotspot VM removes the need for a JIT compiler in most cases.
**************************
Memory spaces in jdks:
Sun JDK has the following memory spaces: Eden space, survivior space, tenured generation and permanent generation. The objects move from one space to another according to its age and survival from garbage collection.
JRockit has 2 spaces, young generation and old generation, it uses the same mechanism of garbage collection. There is nothing called as permanent generation in JRockit.
*************************
Memory and other JVM tunings:
JRockit gives advanced JVM tunings. From the release R26 and above, JRockit takes care of few tunings by itself. For example if there is an outofmemory occuring on the native TLA in previous releases due to insufficient TLA size which is 2k by default, in later releases the JRockit tunes these settings as per the requirement of the application. This has to be done and taken care of by the user in case of sun jdk. But then it is always better to be in a safer side it is recommended to have the tunings done by self.
*************************
JVM Crashes:
When JRockit crashes, a JRockit dump is produced which basically has the reason for the crash. JRockit uses native libraries by default. This can be disabled by disabling the NativeIO from the admin console. The most common reason for the JRockit crash is the conflict between native libraries. For example, the jdbc type 2 drivers which use native libs. It is recommended to use type 4 pure java drivers when using oracle JRockit. Another reason for the crash can be code optimization because of its complexity. The stack trace in the JRockit dump will show the exact cause. When the JVm crashes, it is important to test it again by disabling code optimization and check if the issue still persists.
A sun jdk crash produces hs_err_pid file which has the root cause of the crash. There can be several reasons for sun jdk crash are due to bugs in them (defects in the code of the jdk). These issues need to be reported to the sun team.
**************************
Tools for performance tracking:
Sun jdk that comes bundled with weblogic server gives tools like JConsole which can be used for performance tracking and monitoring the memory in use of the JVM. This tool is very much necessary so that each and every detail about the memory being used by the application, cpu usage, memory leaks can be identified.
Oracle JRockit has a much more advanced tool JRMC (JRockit mission Control) which gives advanced tracking features. JRA recordings can be taken which gives each detail about the JVM arguements, garbage collection details, methods using the maximum memory etc. The memory leak detector tool in JRMC is also one important and very helpful tool. These make it easy for the user and administrators to maintain a record and identify the issues with the application and the JVM.
**************************

Weblogic Connection Filters

A connection filter allows the server to reject unwanted connections based on some filter criteria. For example, a connection filter would allow you to configure WebLogic to permit T3 or IIOP connections only from within your intranet, and reject any T3 or IIOP connection request from outside the intranet. So, connection filtering provides network-level access control.
WebLogic comes equipped with a default connection filter called  weblogic.security.net.ConnectionFilterImpl that examines one or more connection filter rules defined in the Administration Console. Alternatively, you can create your own custom connection filter that evaluates the basis that incoming connections are accepted by the server.
Please follow the steps to configure the Connection Filter.
Login into to the console. Click on the Domain Name  –> Security –> Filter . 


 Define the ConnectionFilter class.
You can use the default class :  weblogic.security.net.ConnectionFilterImpl
3. Specify “Connection Filter Rules”.


You can specify any number of rules; each rule should be on a single line. The syntax for a connection filter rule is shown here:
target localAddress localPort action protocolList
Here are the definitions for the parameters of a connection filter rule:
  • The target parameter specifies the client hosts that the rule must examine. We discuss its syntax later.
  • The localAddress parameter refers to the server’s host address to which the client connects. If you specify an asterisk (*), this matches all local IP addresses.
  • The localPort parameter indicates the server port to which the client connects. If you specify an asterisk (*), this matches all available ports.
  • The action parameter indicates whether the rule should allow or reject the incoming connection request. It can take two possible values: allow or deny.
  • Use the protocolList parameter to define a space-separated list of protocol names that should be matched. The protocol names can be: http,httpst3t3s etc. If no protocols are listed, the rule checks for all protocols.
For Example:
www.NEGI.com 127.0.0.1 7001 deny t3 t3s http https
If you want to deny t3 t3s http https protocol access  from www.NEGI.com to the local server.
Note: Restart the servers.
4. Testing the connection.
Open a command prompt, set the environment by running the setDomainEnv script.
Try to connect to the server from the machine that is denied the access to.
You would see the below exception on the client side.
javax.naming.CommunicationException [Root exception is java.net.ConnectException: t3://localhost:7001: Destination unreachable; nested exception is:
java.io.IOException: Login failed: Failed: [Socket:000445]Connection rejected, filter blocked Socket, weblogic.security.net.FilterException: [Security:090220]rule 1; No available router to destination]
The Connection Filter is properly configured now.
An entry in the config.xml file would like below.
<connection-filter>weblogic.security.net.ConnectionFilterImpl</connection-filter>
<connection-filter-rule>localhost 127.0.0.1 7001 deny t3 t3s http https</connection-filter-rule>


Configure Apache Webserver with Weblogic Server

Configure Apache Webserver with Weblogic Server


Configuring apache with weblogic server is very straight process. You have to copy module file ( plugin ) [ which comes with weblogic ( .so file ) or WLS 12 onwards you have to manually download the plugins directly from weblogic website ] to apache module directory and have to enable certain forward rules for load balancing requests to different managed servers.

Here are the exact steps -


Step 1) 

After apache installation, if needed update httpd.conf file to run apache on some specific port apart from 80, like if you want your apache to run on port 8080 then edit httpd.conf file and update Listen Port parameter from default 80 to 8080 and restart apache.

Listen 8080
Now to test if your apache is running properly or not just hit http;//<host>:8080 and you will apache default welcome message.


Step 2) 

Copy the mod_wl_20.so from Oracle_Home\WL_HOME\server\plugin\win\32 to your apache module directory ( like for me it's  C:\Program Files\Apache Group\Apache2\modules)
Step 3) 

Add below lines in the httpd.conf file
LoadModule weblogic_module modules/mod_wl_20.so
<Location />
SetHandler weblogic-handler
</Location>
<IfModule mod_weblogic.c>
WebLogicCluster localhost:7003,localhost:7005
Debug ON
WLLogFile c:/temp/wlproxy.log
WLTempDir c:/temp
</IfModule>

Here we have defined location as /, means it will redirect all requests to weblogic server ( for example, if you will modify it as /console then it will redirect only /console requests to weblogic server )

WeblogicCluster we have added all managed servers listen address and ports, apache will load balance the requests between all servers defined there  ( if there is no configuration and other issues )

Debug ON is only required for some troubleshooting purpose, otherwise it should be off

WLLogFile will create the debug log file
Step 4)

 Now, deploy you application across your weblogic cluster and restart Apache and access the application deployed on the Cluster using
http://localhost:8080/your_application_context

This will forward the request to the Weblogic Cluster

Friday, 8 July 2011

WebLogic Server Application Packaging

Packaging Overview
WebLogic Server J2EE applications are packaged according to J2EE specifications. J2EE defines component behaviors and packaging in a generic, portable way, postponing run-time configuration until the component is actually deployed on an application server.
J2EE includes deployment specifications for Web applications, EJB modules, enterprise applications, client applications, and resource adapters. J2EE does not specify how an application is deployed on the target server—only how a standard component or application is packaged.
For each component type, the specifications define the files required and their location in the directory structure. Components and applications may include Java classes for EJBs and servlets, resource adapters, Web pages and supporting files, XML-formatted deployment descriptors, and JAR files containing other components.
An application that is ready to deploy on WebLogic Server may require WebLogic-specific deployment descriptors and, possibly, container classes generated with the WebLogic EJB, RMI, or JSP compilers.

JAR Files
A file created with the Java jar tool bundles the files in a directory into a single Java ARchive (JAR) file, maintaining the directory structure. The Java classloader can search for Java class files (and other file types) in a JAR file the same way that it searches a directory in its classpath. Because the classloader can search a directory or a JAR file, you can deploy J2EE components on WebLogic Server in either an "exploded" directory or a JAR file.
JAR files are convenient for packaging components and applications for distribution. They are easier to copy, they use up fewer file handles than an exploded directory, and they can save disk space with file compression. If your Administration Server manages a domain with multiple WebLogic Servers, you can only deploy JAR or EAR files, because the Administration Console does not copy expanded directories to Managed Servers.
The jar utility is in the bin directory of your Java Development Kit. If you have javac in your path, you also have jar in your path. The jar command syntax and behavior is similar to the UNIX tar command.
The most common usages of the jar command are:
jar cf jar-file files ...
Creates a JAR file named jar-file containing listed files. If you include a directory in the list of files, all files in that directory and its subdirectories are added to the JAR file.
jar xf jar-file
Extract (unbundle) a JAR file in the current directory.
jar tf jar-file
List (tell) the contents of a JAR file.
The first flag specifies the operation: create, extract, or list (tell). The f flag must be followed by a JAR file name. Without the f flag, jar reads or writes JAR file contents on stdin orstdout which is usually not what you want. See the documentation for the JDK utilities for more about jar command options
Packaging Resource Adapters ( RAR files )
To stage and package a resource adapter:
  1. Create a temporary staging directory anywhere on your hard drive.
  2. Compile or copy the resource adapter Java classes into the staging directory.
  3. Create a JAR to store the resource adapter Java classes. Add this JAR to the top level of the staging directory.
  4. Create a META-INF subdirectory in the staging directory.
  5. Create an ra.xml deployment descriptor in the META-INF subdirectory and add entries for the resource adapter.


  6. Create a weblogic-ra.xml deployment descriptor in the META-INF subdirectory and add entries for the resource adapter.

  7. When the resource adapter classes and deployment descriptors are set up in the staging directory, you can create the RAR with a JAR command such as:
    jar cvf jar-file.rar -C staging-dir
    This command creates a RAR that you can deploy on a WebLogic Server or package in an enterprise application archive (EAR).
    The -C staging-dir option instructs the JAR command to change to the staging-dir directory so that the directory paths recorded in the JAR are relative to the directory where you staged the resource adapters.


Packaging Enterprise Applications: Main Steps ( EAR Files )
To stage and package an Enterprise application:
  1. Create a temporary staging directory anywhere on your hard drive.
  2. Copy the Web archives (WAR files) and EJB archives (JAR files) into the staging directory.
  3. Create a META-INF subdirectory in the staging directory.
  4. Set up your shell environment.
    On Windows NT, execute the setenv.cmd command, located in the directory server\bin\setenv.cmd, where server is the top-level directory in which WebLogic Server is installed.
    On UNIX, execute the setenv.sh command, located in the directory server/bin/setenv.sh, where server is the directory in which WebLogic Server is installed.

  5. Execute the following command to automatically generate the application.xml deployment descriptor in the META-INF subdirectory:
    java weblogic.ant.taskdefs.ear.DDInit staging-dir
    where staging-dir refers to the staging directory.
    Alternatively, you can create the application.xml file automatically in the META-INF directory. 

  6. Optionally create the weblogic-application.xml file manually in the META-INF directory.

  7. Create the Enterprise Archive (EAR file) for the application, using a jar command such as:
    jar cvf application.ear -C staging-dir
    The resulting EAR file can be deployed using the Administration Console or the weblogic.Deployer command-line utility.


Staging and Packaging EJBs ( JAR files )
To stage and package an Enterprise JavaBean (EJB):
  1. Create a temporary staging directory anywhere on your hard drive (for example, c:\stagedir).
  2. Compile or copy the bean's Java classes into the staging directory.
  3. Create a META-INF subdirectory in the staging directory.
  4. Set up your shell environment.
    On Windows NT, execute the setenv.cmd command, located in the directory server\bin\setenv.cmd, where server is the top-level directory in which WebLogic Server is installed.
    On UNIX, execute the setenv.sh command, located in the directory server/bin/setenv.sh, where server is the top-level directory in which WebLogic Server is installed and domain refers to the name of your domain.

  5. If you are using EJB 1.1, e the following command to automatically generate the ejb-jar.xmlweblogic-ejb-jar.xml, and weblogic-rdbms-cmp-jar-bean_name.xml (if needed) deployment descriptors in the META-INF subdirectory:
    java weblogic.ant.taskdefs.ejb11.DDInit staging-dir
    where staging-dir refers to the staging directory. Use this utility for EJB 1.1.
    If you are creating EJB 2.0, execute:
    java weblogic.ant.taskdefs.ejb20.DDInit staging-dir
    Alternatively, you can create the EJB deployment descriptor files manually. Create an ejb-jar.xml and weblogic-ejb-jar.xml files in the META-INF subdirectory. If the bean is an entity bean with container-managed persistence, create a weblogic-rdbms-cmp-jar—bean_name.xml deployment descriptor in the META-INF directory with entries for the bean. Map the bean to this CMP deployment descriptor with a <type-storage> attribute in the weblogic-ejb-jar.xml file.

    When all of the enterprise bean classes and deployment descriptors are set up in the staging directory, create the EJB JAR file with a jar command such as:
    jar cvf jar-file.jar -C staging-dir
    This command creates a JAR file that you can deploy on WebLogic Server.
    The -C staging-dir option instructs the jar command to change to the staging-dir directory so that the directory paths recorded in the JAR file are relative to the directory where you staged the enterprise beans.
    Enterprise beans require container classes, classes the WebLogic EJB compiler generates to allow the bean to deploy in a WebLogic Server. The WebLogic EJB compiler reads the deployment descriptors in the EJB JAR file to determine how to generate the classes. You can run the WebLogic EJB compiler on the JAR file before you deploy the beans, or you can let WebLogic Server run the compiler for you at deployment time. 


Packaging Web Applications ( WAR files )
To stage and package a Web application:
  1. Create a temporary staging directory anywhere on your hard drive. You can name this directory anything you want.
  2. Copy all of your HTML files, JSP files, images, and any other files that these Web pages reference into the staging directory, maintaining the directory structure for referenced files. For example, if an HTML file has a tag such as <img src="images/pic.gif">, the pic.gif file must be in the images subdirectory beneath the HTML file.
  3. Create META-INF and WEB-INF/classes subdirectories in the staging directory to hold deployment descriptors and compiled Java classes.
  4. Copy or compile any servlet classes and helper classes into the WEB-INF/classes subdirectory.
  5. Copy the home and remote interface classes for enterprise beans used by the servlets into the WEB-INF/classes subdirectory.
  6. Copy JSP tag libraries into the WEB-INF subdirectory. (Tag libraries may be installed in a subdirectory beneath WEB-INF; the path to the .tld file is coded in the .jsp file.)
  7. Set up your shell environment.
    On Windows NT, execute the setenv.cmd command, located in the directory server\bin\setenv.cmd, where server is the top-level directory in which WebLogic Server is installed.
    On UNIX, execute the setenv.sh command, located in the directory server/bin/setenv.sh, where server is the top-level directory in which WebLogic Server is installed.

  8. Execute the following command to automatically generate the web.xml and weblogic.xml deployment descriptors in the WEB-INF subdirectory:
    java weblogic.ant.taskdefs.war.DDInit staging-dir
    where staging-dir refers to the staging directory.

    Alternatively, you can create the web.xml and weblogic.xml files manually in the WEB-INF subdirectory manually

    Bundle the staging directory into a WAR file by executing a jar command such as:
    jar cvf myapp.war -C staging-dir
    The resulting WAR file can be added to an Enterprise application (EAR file) or deployed independently using the Administration Console or the weblogic.Deployercommand-line utility.