- Home
- Download
- Upgrade
- Forums
- Community
- Tutorial
- Library
- Oracle Documents
- Weblogic on Youtube
- Demos & Videos
- Samples Applications
- Beginners Guide
- Basic Concepts
- Installation
- Domain
- Cluster
- Deployment
- Node Manager
- JMS
- Security
- WLST
- Performance Tuning
- Advance Topics
- Apache
- Weblogic Server 12c Certification Matrix
- License
- Versions
- Editions & Features
- Patches
- Critical Patch Updates (Quaterly)
- Coherence*Web
Saturday, 23 March 2013
Weblogic Server Performance Tuning
Weblogic Server Performance Tuning
Guys, I am still updating this page, give me few more days for this :)
Performance tuning is depend on lot's of factors like -
Operating System
If your operating system is properly tuned or not, there are lot's of O.S parameters need to be tune by your System Administartor and for some parameters some specific values recommended by the oracle according to different operating systems.
Application
Weblogic performance is depend on your application code also and lots of time the performance issues are there due to poor code, like in some cases database connection not closed properly cause threads got stuck or jvm out of error issues.
Database
Database is also one of the major factor if your application using the database and lots of parameters need to be taken care at database side also when you start thinking about your weblogic server tuning like processes, open_cursors, SGA, number of supported users etc
Specific to Weblogic
Specific to weblogic, the first point came to everybody mind is the JVM & heap , and yes JVM & heap both are the main factors of weblogic performance tuning since your servers run on JVM and all of the objects are processed under your JVM heap, So you need to more careful
on defining the heap size since excess and shortage of anything could be harmful, So excess of heap as well as shortage of heap both could impact your application server performance.
The factors need to keep in mind before heap setting is -
1. If you are using 32bit or 64 bit O.S
Since there is a limitation of max heap for a JVM according to bit of O.S. For a 32-bit process model, the maximum virtual address size of the process is typically 4 GB, though some operating systems limit this to 2 GB or 3 GB. For 64-bit process models, the maximum is essentially unlimited.
2. What is the total RAM of your O.S
Since you have to define heap for your servers according to the availability of RAM as well as you can define up to 80% of available for your weblogic servers and need to keep rest 20% for your O.S process.
3. Minimum and Maximum heap
You should define minimum heap size of your JVM equal to the maximum heap size for better performance to minimize the garbage collection since your JVM paused during the garbage collection period.
4. JVM vendor and version
Use only production JVMs on which WebLogic Server has been certified.
5.
Guys, I am still updating this page, give me few more days for this :)
Performance tuning is depend on lot's of factors like -
Operating System
If your operating system is properly tuned or not, there are lot's of O.S parameters need to be tune by your System Administartor and for some parameters some specific values recommended by the oracle according to different operating systems.
Application
Weblogic performance is depend on your application code also and lots of time the performance issues are there due to poor code, like in some cases database connection not closed properly cause threads got stuck or jvm out of error issues.
Database
Database is also one of the major factor if your application using the database and lots of parameters need to be taken care at database side also when you start thinking about your weblogic server tuning like processes, open_cursors, SGA, number of supported users etc
Specific to Weblogic
Specific to weblogic, the first point came to everybody mind is the JVM & heap , and yes JVM & heap both are the main factors of weblogic performance tuning since your servers run on JVM and all of the objects are processed under your JVM heap, So you need to more careful
on defining the heap size since excess and shortage of anything could be harmful, So excess of heap as well as shortage of heap both could impact your application server performance.
VM Heap Size and Garbage Collection
The Java heap is where the objects of a Java program live. It is a repository for live objects, dead objects, and free memory.
When an object can no longer be reached from any pointer in the running program, it is considered "garbage" and ready for collection and this cleaning process called garbage collection.
The JVM heap size determines how often and how long the VM spends collecting garbage. An acceptable rate for garbage collection is application-specific and should be adjusted after analyzing the actual time and frequency of garbage collections. If you set a large heap size, full garbage collection is slower, but it occurs less frequently. If you set your heap size in accordance with your memory needs, full garbage collection is faster, but occurs more frequently.
The goal of tuning your heap size is to minimize the time that your JVM spends doing garbage collection while maximizing the number of clients that WebLogic Server can handle at a given time. To ensure maximum performance during benchmarking, you might set high heap size values to ensure that garbage collection does not occur during the entire run of the benchmark.
The factors need to keep in mind before heap setting is -
1. If you are using 32bit or 64 bit O.S
Since there is a limitation of max heap for a JVM according to bit of O.S. For a 32-bit process model, the maximum virtual address size of the process is typically 4 GB, though some operating systems limit this to 2 GB or 3 GB. For 64-bit process models, the maximum is essentially unlimited.
2. What is the total RAM of your O.S
Since you have to define heap for your servers according to the availability of RAM as well as you can define up to 80% of available for your weblogic servers and need to keep rest 20% for your O.S process.
3. Minimum and Maximum heap
You should define minimum heap size of your JVM equal to the maximum heap size for better performance to minimize the garbage collection since your JVM paused during the garbage collection period.
4. JVM vendor and version
Use only production JVMs on which WebLogic Server has been certified.
5.
Thursday, 21 March 2013
Weblogic Node Manager
Weblogic Node Manager
Node Manager and Configuration Files
Verify Node Manager Status From Console
Configure and Start Stop Node Manager
Node Manager Configuration and Important Considerations
SSL Exceptions In Admin and Node Manager
Rotating Node Manager .out Log Files
Node Manager or Domain Enrollment Using nmEnroll()
Node Manager and Configuration Files
Verify Node Manager Status From Console
Configure and Start Stop Node Manager
Node Manager Configuration and Important Considerations
SSL Exceptions In Admin and Node Manager
Rotating Node Manager .out Log Files
Node Manager or Domain Enrollment Using nmEnroll()
Node Manager in Weblogic Server 12C
Weblogic Server Deployment
Weblogic Server Deployment
Application Packaging
Archive and Exploded Forms
Difference Between War, Ear & Jar File
Archive File ( war, ear etc ) Deployment
Web Application Overview
Creating War File and Directory Structure
EAR File Directory Structure
Weblogic Server Autodeployment
Partial Redeployment Of Static File
How to Make Application as Default Web Application
Application Deployment As a Library
Quick Deployment Using WLST
Weblogic Side By Side Deployment
Weblogic Server Application Status
Weblogic Disable On-Demand Deployment Of Console Application
Weblogic Server Domain Creation
Weblogic Server Domain Creation
Weblogic : Create Domain ( Console Mode & In Development Mode )
Weblogic : Create Domain ( GUI Mode )
Weblogic : Create Domain Using Domain Template Builder
Weblogic Domain Creation ( Console Mode With Clustering )
Weblogic : Domain Enrollment With NmEnroll()
Domain Directory Contents
Pack and Unpack a Domain
Weblogic Advance Topics
Weblogic Advance Topics
What is Coherence
Coherence Practical Example
What is web cache ?
Basic idea on Keystore, public key, private key, cerrtificates
Self Sign certificate configuration for Weblogic
Third party SSL configuration for Weblogic
Session replication in Weblogic
1. JDBC based session replication
2. In-memory session replication
JMS clustering in weblogic
Recover weblogic Admin user, JDBC connection pool, keystore password
Jrockit Mission control JRA and JRF recording
Wednesday, 20 March 2013
Weblogic Server 11G and 12C Installation
Weblogic Server Installation
Weblogic Server 11G and 12C Installation
Start or double click on the installer
( WLS 12 windows installer file - oepe-indigo-installer-12.1.1.0.0.201112072225-12.1.1-win32 )
On welcome screen press next
In next screen, select weblogic installation directory called MIDDLEWARE_HOME OR ORACLE_HOME ( Earlier called BEA_HOME )
Next screen will prompt you for if you want to receive security updates, Let this option in check state, enter your email id and your oracle support identifier if you want to get updates from oracle like they will send you an email when they will release any new path or bug etc, other wise just uncheck this option and press next
you will get below popup once you will uncheck the option, click on yes
Now click on next
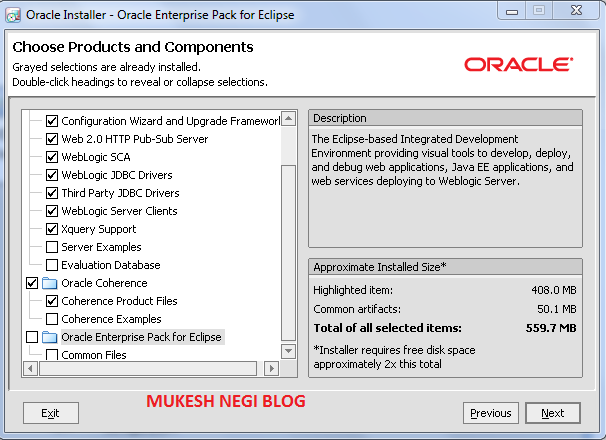
Next, you will see Typical and Custom option, if you will select Typical then it will install everything that comes default with installer like weblogic, pointbase evaluation database, coherence, enterprises pack for eclips, sample applications etc but if you will select custom then you will get option to which components you want to install. ( I have forwarded with custom option after that )
I have deselected evaluation database, coherence examples and oracle enterprises pack for eclips ( because if you don't want then then no need to waste extra space for them )
Next, you can select the java release you want to use ( Jrockit recommended for production and SDK fro non prod )
Next select Product home for Weblogic as well as for Coherence ( if you have select Coherence, otherwise this option will display for you )
weblogic product home you also refer with parameter WL_HOME
Below option is valid for only Windows, select yes if you want to registered Node Manager as a window service, means node manager will start automatically as window serviced everytime you will start your pc. I have selected it as No
Below option also only valid for Windows installation, select default option All users option so that any person who will log into the pc with his id can able to see weblogic option on start > programs menu and if you want only you can able to see weblogic options then select Local user's option
Now click on next option
you will see the progress screen like below
Now you are done with the installation
Related posts
Weblogic installation in Console Mode
Installation Guide for Weblogic Server
Weblogic Server License
Weblogic Server 11G and 12C Installation
Start or double click on the installer
( WLS 12 windows installer file - oepe-indigo-installer-12.1.1.0.0.201112072225-12.1.1-win32 )
On welcome screen press next
In next screen, select weblogic installation directory called MIDDLEWARE_HOME OR ORACLE_HOME ( Earlier called BEA_HOME )
Next screen will prompt you for if you want to receive security updates, Let this option in check state, enter your email id and your oracle support identifier if you want to get updates from oracle like they will send you an email when they will release any new path or bug etc, other wise just uncheck this option and press next
you will get below popup once you will uncheck the option, click on yes
Now click on next
Next, you will see Typical and Custom option, if you will select Typical then it will install everything that comes default with installer like weblogic, pointbase evaluation database, coherence, enterprises pack for eclips, sample applications etc but if you will select custom then you will get option to which components you want to install. ( I have forwarded with custom option after that )
I have deselected evaluation database, coherence examples and oracle enterprises pack for eclips ( because if you don't want then then no need to waste extra space for them )

Next, you can select the java release you want to use ( Jrockit recommended for production and SDK fro non prod )
Next select Product home for Weblogic as well as for Coherence ( if you have select Coherence, otherwise this option will display for you )
weblogic product home you also refer with parameter WL_HOME
Below option is valid for only Windows, select yes if you want to registered Node Manager as a window service, means node manager will start automatically as window serviced everytime you will start your pc. I have selected it as No
Below option also only valid for Windows installation, select default option All users option so that any person who will log into the pc with his id can able to see weblogic option on start > programs menu and if you want only you can able to see weblogic options then select Local user's option
Now click on next option
you will see the progress screen like below
Now you are done with the installation
Related posts
Weblogic installation in Console Mode
Installation Guide for Weblogic Server
Weblogic Server License
Sunday, 17 March 2013
Weblogic Server SSL Configuration : Keystore, Public Private Keys
Weblogic Server SSL Configuration
Note : - it's a third party SSL certificate configuration NOT self signed, For self sign certificate configuration see my this post -
Know about SSL, Identity & Trust
Self Signed Certificate Configuration
High Level Steps
1. Generate public & private key OR you can say generate a Keystore
2. Create CSR ( Certificate Service Request ) & send to certificate authority
3. Authority will send you ssl certificate, root certificate & intermediate certificate
4. Import all certificates to your keystore
5. Create/import trust using root certificate
6. Configure Weblogic for SSL which includes
i) Keystore tab configuration
ii) SSL tab configuration
iii) Enable SSL option with SSL port
In Detailed
Make sure you have java bin path properly set or run below commands directly from inside
java bin folder where you have keytool.exe/sh file
( In my case it's C:\Oracle\Middleware2\jrockit_160_24_D1.1.2-4\bin and I ran commands
from this directly only )
Generate Keystore - Public & Private Key
keytool -genkey -alias alias123 -keyalg RSA -keysize 2048 -keystore identity.jks -storepass storepass123 -keypass keypass123
Here you will get Identity file identity.jks
Note : Here instead of your first and last name you can give your domain name for which you are going to take certificate
Generate CSR
keytool -certreq -keyalg RSA -keysize 2048 -alias alias123 -file certreq.csr -keystore identity.jks -storepass storepass123 -keypass keypass123
Here you will get csr in certreq.csr file
Now you have to send this CSR to certificate authority and they will give you SSL certificate, root certificate & intermediate certificate
I have used Symantec trial certificate, follow below steps to get trial certificates
Go to https://www.symantec.com/verisign/ssl-certificates and click on try it free option as shown below
Click on continue
Paste your csr ( from certreq,csr ) here, select your server, if not there then select not listed and enter weblogic
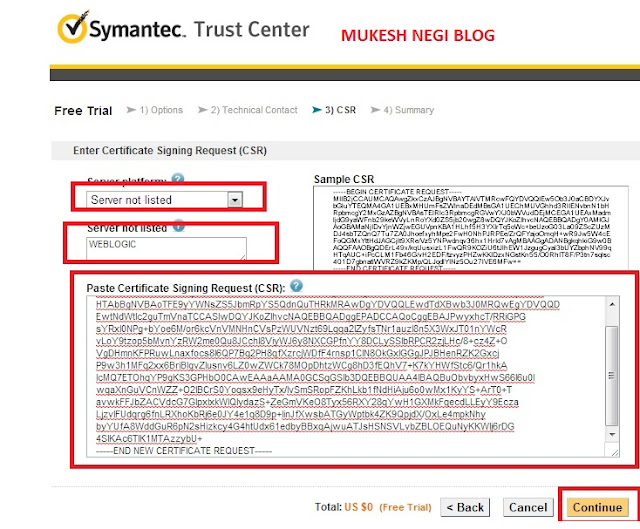
you may get below screen, click continue
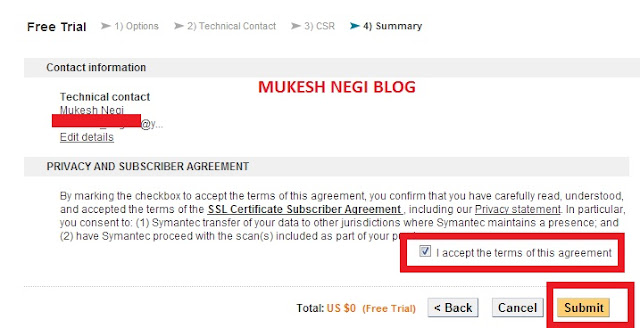
Accept aggrement and click continue
check your email
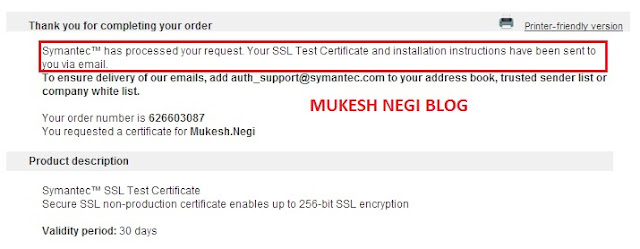
You will get mail like below
(1) - Is the certificate
(2). Is the root certificate
(3). Is the intermediate certificate
Now, copy #1 ( from BEGIN CERTIFICATE till END OF CERTIFICATE ) and save in a text file and rename it as cert.cer
Now click on #2 link and save certificate details in a text file rootCA.cer
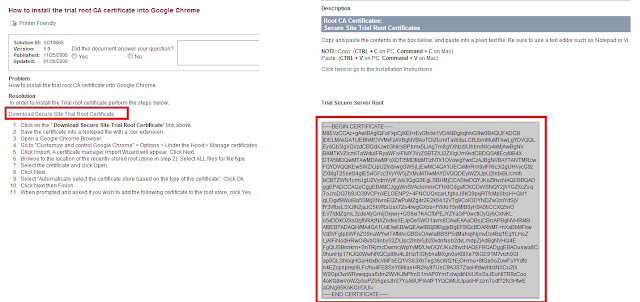
---------------------------------------------------------------------------------------------------------------------------------( As highlighted below, this is a trial certificate so need to install on each client browser those going to access this application, since we are doing just for testing so you don't need to worry about it and also for production its not required, so take it just as a info )
Click for any one of the browser SO##### link
copy the certificate details and paste in a text file and rename it as rootCA.csr
---------------------------------------------------------------------------------------------------------------------------------
Now click on #3 link and same like above save certificate details in a text file and rename it as intermediatCA.cer
Now you have three files
1. cert.cer
2. rootCA.cer
3. intermediateCA.cer
Now, open a blank text file and copy/append all above three file contents in the same file and rename it as CertRootInter.pem ( copy in the same above sequence, first cert.csr, rootCA.csr just below and intermediateCA.csr at last )
Now you have one more file called CertRootInter.pem
Now, Import CertRootInter.pem ( which contain your all three certificates ) to you keystore
keytool -import -file CertRootInter.pem -alias alias123 -keystore identity.jks -storepass storepass123 -keypass keypass123
Next, create your trust file trust.jks by importing rootCA.cer
keytool -import -file rootCA.cer -alias alias321 -keystore trust.jks -storepass storepass123 -keypass keypass123
Now - you got your -
1. Identity file ( identity.jks ) which contains the certificates you got from certificate authority
2. Trust file ( trust.jks ) which contain rootCA certificate
Next, you can verify the certificate details from your keystore
Keytool -list -v -keystore identity.jks -storepass storepass123
Next Part is to configure weblogic which includes
- Keystore tab configuration
- SSL tab configuration
- Enable SSL port
Note :- This need to perform for each and every server for which you want to enable SSL
Login to admin console, click on your server, then on keystore tab and do the configuration like below
Click on configuration > Keystores, then select Custom Identity & Custom Trust option and save
Now, enter details of your identity and trust file with complete path where you have placed them, keystore type ( which is jks here ) and keystore passphrase for identity and trust ( we hace used storepass123 for both )
Now click on SSL tab and enter your private key alias ( alias123 here ) and passphrase ( keypass123 here )
Now go to General > Configuration and enable SSL option with the SSL port
Now you can check log file to make it's enabled properly and no error displaying there
Ok, So I have enabled SSL for admin server and I can able to access my admin console with http ( using port 7001 ) and with https ( using ssl port which i have used 7002 )
http://localhost:7001/console
https://localhost:7002/console
in the same way if you have enabled it for the managed server where you have deployed your applications then you can use your application using https also.
cheers...you are done!!!!!!!!!
Tuesday, 5 March 2013
Weblogic JMS Clustering Configuration High Availability
Weblogic JMS – High Availability Configuration with UDD (Uniform Distributed Distribution)
Guys, as we all know a Weblogic Server cluster is a group of servers in a domain that work together to provide a more scalable, more reliable application platform than a single server. A cluster appears to its clients as a single server but is in fact a group of servers acting as one.
JMS clustering also work in the same way, instead of defining a single queue which can be targeted to only a single JMS server, you can define a UDD distributed queue or topic which you can targeted to multiple JMS servers in a cluster and the client can send message to distributed queue where this message can be load balanced to any JMS server in the cluster.
So, the basic architecture with a two managed server cluster
- Create a cluster with two managed server
- Create two JMS servers pointing to each of the Managed server, you can create custom file base or JDBC filestore for each of the JMS server or the default one for each of the server will be use ( which is $DOMAIN/servers/YOUR_SERVER/data/store/default )
- Create a JMS module targeted to the cluster
- Create a Subdeployment under JMS module targeted to your both of the JMS server
- Create a JMS resource “Distributed Destination” under your JMS module and target to you previous created Subdeployment ( in step 4 )
See below graphical architecture
- Here, you have two managed servers Managed-Server1 and Managed-Server2 which you have clustered under cluster – JMSCluster
- Two JMS servers, JMS-server1 and JMS-server2 with corresponding persistent stores Persistent-stroe1 and Persistent-store2, targeted to Managed-server1 & Managed-server2
- JMS module JMSMod1 which is targeted to your cluster
- Under JMSMod1, Subdeployment SD1 which is targeted to your both JMS servers JMS-server1 & JMS-server2
- A distributed queue DQ1 under Subdeployment SD1
Now, JMS client ( here in diagram QS ( queue sender ) ) will sends message to distributed queue DQ1, and distributed Queue DQ1 will load balanced the messages ( according to the load balance algo selected during creation of distributed queue, round robin by default ) between both JMS servers and message receiver ( here in diagram its QR ( queue receiver ) ) will receive the message from any of the JMS server.
In the same way you can define distributed topic.
Will update example with screen soon in my next blog …………Keep reading
Related Posts
Subscribe to:
Comments (Atom)


