
Weblogic Server SSL Configuration : Self Signed Certificate Configuration
For concepts on self sign certificate and trusted certificate authority certificate please read my below post -
http://weblogicserveradministration.blogspot.com/2012/11/weblogic-ssl-trusted-certificate.html
The basic concept of configuring the self sigh certificate is -
1. Create public-private keypair OR you can say create identity OR you can say create keystore
2. Extract/export self sign certificate or say root certificate from above created
keystore/identity/public-private keypair
3. Create trust keystore by importing above exported root certificate
4. Configure weblogic for identity and trust
Note :- Before going a head for below steps make sure you have jdk/bin on your path variable and you are able to run keytool otherwise you run below commands under jdk/bin directory and later place created .jks files to necessary directory
Steps
1. Create identity keystore ( or public-private keypair)
keytool -genkey -alias alias123 -keyalg RSA -keypass weblogic123 -keystore identity.jks -storepass weblogic321 -validity 365

2. Since it's a self sign certificate so, Export root certificate from keystore
keytool -export -alias alias123 -file root.cer -keystore identity.jks -storepass weblogic321
3. Create trust keystore
keytool -import -alias alias123 -trustcacerts -file root.cer -keystore trust.jks -storepass weblogic321

Now you have identity.jks, trust.jks and root.cer
VERIFICATION
NOTE : - MAKE SURE TO RUN BELOW COMMAND INSIDE THE DIRECTORY WHERE YOU HAVE YOU .JKS AND .CER FILES OTHERWISE DEFINE COMPLETE PATH OF FILE ON BELOW COMMANDA EXPLICITELY
To List certificates inside identity keystore
keytool -list -v -keystore identity.jks -storepass weblogic321

To list contents of trust keystore
keytool -list -v -keystore trust.jks -storepass weblogic321

To view exported root certificate
keytool -printcert -file root.cer

4. Weblogic Level Configuration
Login to admin console, click on server, then click on -
4.1 keystore tab on right hand side, then for keystore: option select "custom identity and trust",
then enter identity and trust path with storepass you have used

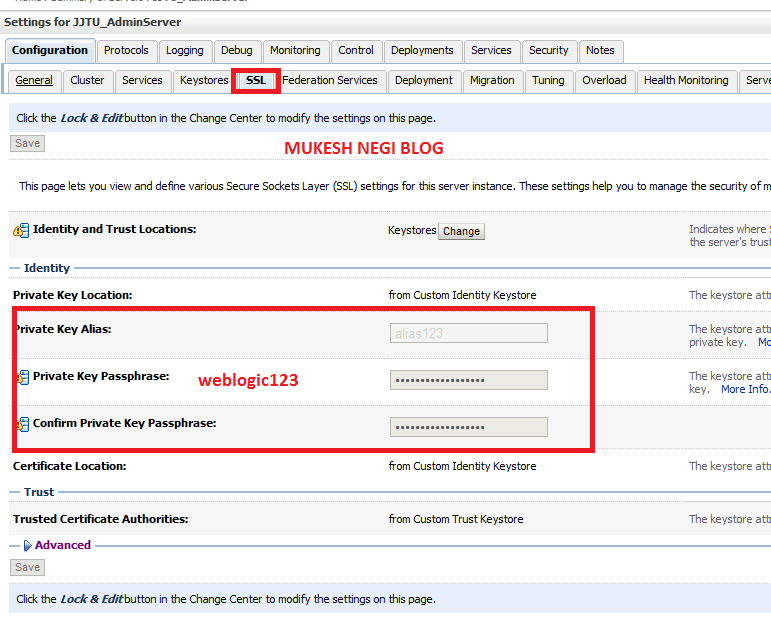
4.2 SSL tab on right hand side, then enter alias value and keypass you have used
5. Now enable SSL from admin console
Go to admin console, select server, under configuration select ssl checkbox and enter the desired port on which port you want to run ssl connection, now bring down weblogic and start again
Now access admin console and your application as https instead of http
admin console - https://host:ssl_port/console
Next
Configure Weblogic Node Manager SSL Configuration
Configure Weblogic Node Manager SSL Configuration
1. If running Stop your node manager
2. update nodemanager.properties file for -
2.1
KeyStores=CustomIdentityAndCustomTrust
CustomIdentityKeystoreType=jks
CustomIdentityKeyStoreFileName=C\:\\Oracle\\Middleware2\\jrockit_160_24_D1.1.2-4\\bin\\identity.jks
CustomIdentityKeyStorePassPhrase=weblogic321
CustomTrustKeystoreType=jks
CustomTrustKeyStoreFileName=C\:\\Oracle\\Middleware2\\jrockit_160_24_D1.1.2-4\\bin\\trust.jks
CustomTrustKeyStorePassPhrase=
CustomIdentityAlias=alias123
CustomIdentityPrivateKeyPassPhrase=weblogic123
Note : - Above contents from window, for unix/linux use proper path separator
2.1 set secure listener to true
SecureListener=true
2.3 update ListenAddress with proper host
like - ListenAddress=localhost
Since it's self sign certificate so this above step not really required but for safer side you can update
3. Since it's a self sign certificate so disable host name verification
Login to admin console
Go to server > select your server >Configuration>SSL
Click on advanced
select Hostname Verification as "NONE"
Save and activate changes.
Repeat above steps fore all servers in domain
4. Disable host name verification for Node manager
Add below parameter to your node manager startup file, -
unix/linux = startNodeManager.sh
window = startNodeManager.cmd
unix/linux = startNodeManager.sh
window = startNodeManager.cmd
-Dweblogic.nodemanager.sslHostNameVerificationEnabled=falseExample -
"%JAVA_HOME%\bin\java.exe" %JAVA_VM% %MEM_ARGS% %JAVA_OPTIONS% "-Dweblogic.nodemanager.sslHostNameVerificationEnabled=false"
"-Dweblogic.nodemanager.sslHostNameVerificationEnabled=false" "-Djava.security.policy=%WL_HOME%\server\lib\weblogic.policy" "-Dweblogic.nodemanager.javaHome=%JAVA_HOME%" weblogic.NodeManager -v
5. Now change node manager "Type" as SSL from admin console
Login to admin console > select Machine option > select your configured machine > configuration tab > node manager sub tab > set "type" as SSL, save and activate changes
Start your node manager = make sure no error in node manager log file
you are done cheers!!!!
VERY GOOOD
ReplyDeleteThank u for the good stuff
ReplyDelete