
Weblogic Server Installation
Weblogic Server 11G and 12C Installation
Start or double click on the installer
( WLS 12 windows installer file - oepe-indigo-installer-12.1.1.0.0.201112072225-12.1.1-win32 )

On welcome screen press next

In next screen, select weblogic installation directory called MIDDLEWARE_HOME OR ORACLE_HOME ( Earlier called BEA_HOME )

Next screen will prompt you for if you want to receive security updates, Let this option in check state, enter your email id and your oracle support identifier if you want to get updates from oracle like they will send you an email when they will release any new path or bug etc, other wise just uncheck this option and press next

you will get below popup once you will uncheck the option, click on yes

Now click on next

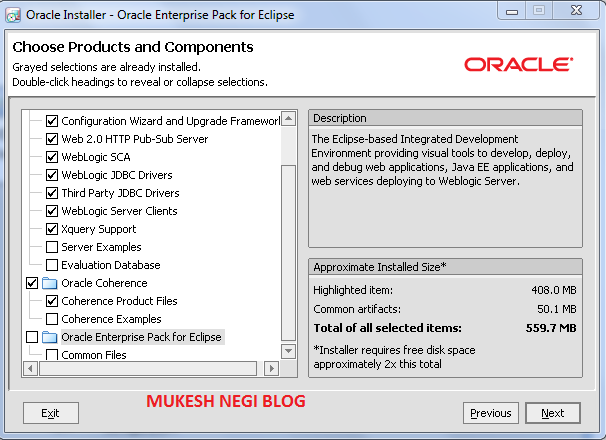
Next, you will see Typical and Custom option, if you will select Typical then it will install everything that comes default with installer like weblogic, pointbase evaluation database, coherence, enterprises pack for eclips, sample applications etc but if you will select custom then you will get option to which components you want to install. ( I have forwarded with custom option after that )

I have deselected evaluation database, coherence examples and oracle enterprises pack for eclips ( because if you don't want then then no need to waste extra space for them )
Next, you can select the java release you want to use ( Jrockit recommended for production and SDK fro non prod )

Next select Product home for Weblogic as well as for Coherence ( if you have select Coherence, otherwise this option will display for you )
weblogic product home you also refer with parameter WL_HOME

Below option is valid for only Windows, select yes if you want to registered Node Manager as a window service, means node manager will start automatically as window serviced everytime you will start your pc. I have selected it as No

Below option also only valid for Windows installation, select default option All users option so that any person who will log into the pc with his id can able to see weblogic option on start > programs menu and if you want only you can able to see weblogic options then select Local user's option

Now click on next option

you will see the progress screen like below

Now you are done with the installation

Related posts
Weblogic installation in Console Mode
Installation Guide for Weblogic Server
Weblogic Server License
Weblogic Server 11G and 12C Installation
Start or double click on the installer
( WLS 12 windows installer file - oepe-indigo-installer-12.1.1.0.0.201112072225-12.1.1-win32 )

On welcome screen press next

In next screen, select weblogic installation directory called MIDDLEWARE_HOME OR ORACLE_HOME ( Earlier called BEA_HOME )

Next screen will prompt you for if you want to receive security updates, Let this option in check state, enter your email id and your oracle support identifier if you want to get updates from oracle like they will send you an email when they will release any new path or bug etc, other wise just uncheck this option and press next

you will get below popup once you will uncheck the option, click on yes

Now click on next

Next, you will see Typical and Custom option, if you will select Typical then it will install everything that comes default with installer like weblogic, pointbase evaluation database, coherence, enterprises pack for eclips, sample applications etc but if you will select custom then you will get option to which components you want to install. ( I have forwarded with custom option after that )

I have deselected evaluation database, coherence examples and oracle enterprises pack for eclips ( because if you don't want then then no need to waste extra space for them )

Next, you can select the java release you want to use ( Jrockit recommended for production and SDK fro non prod )

Next select Product home for Weblogic as well as for Coherence ( if you have select Coherence, otherwise this option will display for you )
weblogic product home you also refer with parameter WL_HOME

Below option is valid for only Windows, select yes if you want to registered Node Manager as a window service, means node manager will start automatically as window serviced everytime you will start your pc. I have selected it as No

Below option also only valid for Windows installation, select default option All users option so that any person who will log into the pc with his id can able to see weblogic option on start > programs menu and if you want only you can able to see weblogic options then select Local user's option

Now click on next option

you will see the progress screen like below

Now you are done with the installation

Related posts
Weblogic installation in Console Mode
Installation Guide for Weblogic Server
Weblogic Server License
No comments:
Post a Comment